
(jump to recipe)
No-bake cheesecakes are a world of their own, so quick, fuss-free, make-ahead, endlessly adaptable and eggless to boot! The eggless aspect of it lends well to a lot of Indian-flavored desserts, something my sister experiments a lot with. She had once made individual no-bake cheesecakes in these clear dessert cups for a party, and they were very well received!
My love for rose and all flavors floral is well-documented on this site, so when this fruity and floral decaffeinated Blood Orange tea showed up in my Simple Loose Leaf tea box, this chilled, no-bake Rose Cheesecake seemed like a really good idea. The mild, tangy and creamy cheesecake lets the fruit and floral flavors shine, the buttery crust provides a good contrast for the sharp and bright flavors, and the coolness of the cake makes it perfect for the upcoming warm weather, where the last thing you want to do is turn on the oven!
The crust is a simple, no-bake one with Nilla wafers (or you can use graham crackers or any neutral, buttery cracker), butter and a pinch of salt. The filling is softened, whipped cream cheese, with whipped cream for extra lift, and flavored with citrus zest (I used lemon, but orange or blood orange would be even better) and rose water/extract. Assembled in the fridge for 4-6 hours, or ideally overnight, this cheesecake is ready to go in all its glory for your teatime and dessert needs – no water baths, collapsed fillings, soggy crusts.
Shall we?

We start with the crust, crushing the crackers using the most low-tech, gadget free option of all: a trusty zip top bag and a small, heavy-bottomed saucepan! Place the crackers in the bag, push all the air out, close it shut, and picture your most annoying coworker (or these days, cohabitant) and have at it with the saucepan! Almost completely crushed is good enough for this rustic cheesecake. If you would rather use the food processor, that’s fine too (but less fun).
Stir in the melted butter and a pinch of salt and combine until the crumbs are moistened. Place in a parchment lined 8×8 square pan (with a 2 inch overhang on all 4 sides) and pat down using a spatula or a flat-bottomed glass or bowl until compact, and set it in the fridge while you make the filling.


For the filling, it helps if the cream cheese is softened a bit, either by leaving it out for few hours or by gently warming it on a double boiler. Rub the sugar and zest together in a large bowl and then place the softened cream cheese in it, and whip it with half the rose water/extract, until light and fluffy. In a separate bowl, whip the heavy cream with the remaining rose water/extract, and then whisk that into the cream cheese in batches (with beaters). You could also use Cool whip or canned whipped cream, but you will not be able to flavor it using the rose water (or any other flavors you might be interested in), in which case add all of the rose water to the cream cheese to begin with!


And we are all ready to assemble! But first, let’s talk about the Rose portion of this dessert.
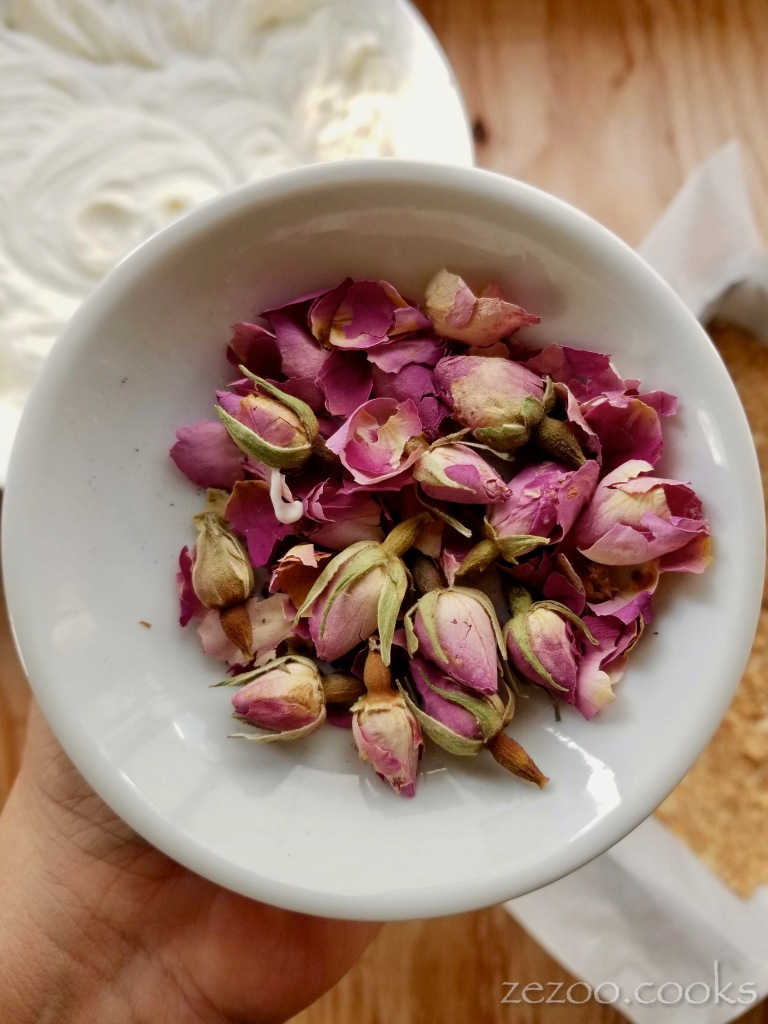
Dehydrated, edible Rose petals are a key portion of the presentation here – not only are they beautiful and extremely gorgeous to look at, they also tell you what kind of flavor you’ll be getting once you cut into the cheesecake. These are usually available at specialty foods stores, or middle eastern grocery stores (I usually get mine, along with rose water from one), and of course, on Amazon.
The ones pictured and used here however are from a Souk (market) in Dubai, and every time I open the box, its like an explosion of fragrance!
Rose petals in general are a nice addition to many desserts, and I have been accused to going a bit overboard with them on occasion. Watch me pretend to care as I devour this cheesecake in a bit!
To assemble this dessert, just spoon the cream cheese and whipped cream filling into the crumb-lined cake pan and smooth over.


Next: sprinkle the petals on top in whichever way you prefer. I went for a thick band in the middle, since I figured the edges may not be as crisp/well-defined as a baked cheesecake. With this I got a nice mix of some plain white squares and some flecked with pink. You could sprinkle some just along the edges, or all over – dealers choice.

Pull back the parchment paper overhang, and then cover the pan with plastic wrap in both directions to make sure it is packed tight. Pulling back the paper and tucking it under the pan will make sure that the paper doesn’t touch and disturb the surface of the cheesecake or the rose petals! Set this in the fridge for 4-6 hours, although overnight is ideal! This also makes it a perfect make-ahead dessert.

After a brief fridge stay, slowly unwrap the plastic, and using the overhang, take the cheesecake out. It should be firm and stay flat. Using a flat spatula transfer it from the parchment paper to a cutting/serving board, and cut into squares or rectangles, however you prefer. The edges might be a bit soft but the center should be firm, and you should get nice clean slices. Wipe the knife with a paper towel in between slices to keep them neat. And the cheesecake is ready to be served!


Now that the cheesecake is ready, let’s brew some tea to go along with it. I’m not a huge fan of fruity teas ordinarily, as they tend to be too artificial and cloyingly sweet with no real fruit flavor, but the Simple Loose Leaf Blood Orange Rooibos tea balances the fruity (blood orange, apple) flavor with a lot of floral (hibiscus, rose hips, safflowers, rose petals) as well as citrus (orange peel, lemon) components, making it perfect for Spring and Summer time!


Not to mention the gorgeous hue! A warm sip of this tea with the cool, fragrant cheesecake is perfect to put any summer evening over the top!
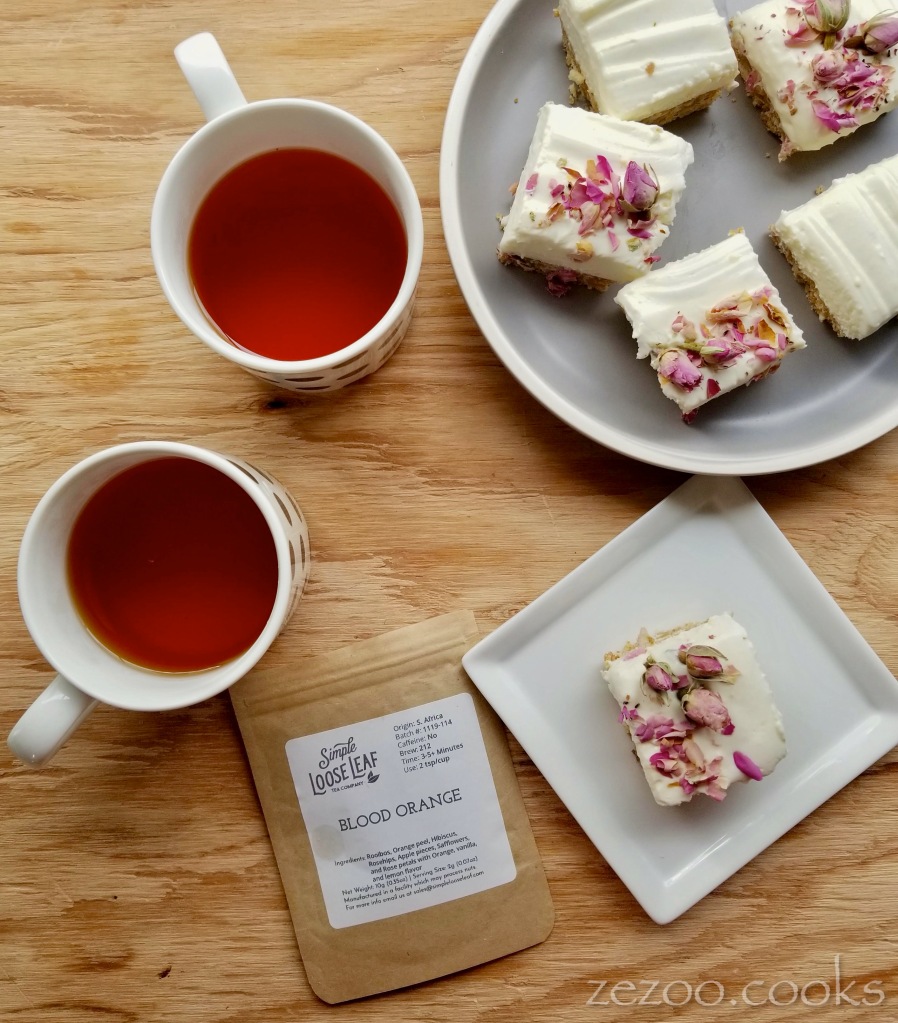

This cheesecake is perfect with tea, or great as a quick daytime dessert in the summer. The presentation is pretty enough for a post-dinner dessert as well!


• Recipe •
No-bake Rose Cheesecake Squares
Adapted from New York Times
Makes 16 2-inch squares
Crust
2 cups (about 225 grams) Nilla wafer or graham cracker crumbs
6 tablespoons butter, melted
1/4 teaspoon salt
Filling
1/2 cup sugar
1/2 teaspoon lemon or orange zest
16 ounces cream cheese, softened (at room temperature)
1/2 cup heavy cream
4-5 tablespoons rosewater (or 1-2 teaspoons rose extract) (use more or less, depending on intensity and flavor)
Garnish
Dry rose petals for garnish (optional but very, very highly recommended)
Line an 8-inch x 8-inch square baking dish with parchment paper (leave at least 2 inch overhang on all 4 sides). Set aside.
Combine the wafer crumbs and butter in a medium bowl and mix well. Pour mixture into the prepared baking dish and press to form a uniform crust.
Place the sugar and zest in a large bowl and rub together to infuse the flavor. Add cream cheese and beat the mixture until light and fluffy.
In a different, medium bowl, beat the heavy cream and rose water (or extract) on high until medium peaks form. Beat whipped cream into the cream cheese mixture in batches, beating until incorporated.
Pour mixture into the prepared pan and smooth the top with a rubber spatula. Top with rose petals (press down gently).
Cover the baking dish with plastic wrap and refrigerate at least 4-6 hours, preferably overnight.
Once fully set, cut into squares and serve cold.
Cheesecake squares will keep well in the fridge for 3-4 days in an airtight container lined with wax or parchment paper (to keep the crust dry). Unfortunately I cannot comment on what happens after 4 days. Make that 3 days.
